You are currently browsing the category archive for the ‘Details’ category.
Etsy has always been my favorite source for unique, handmade goodies but now that they have an actual wedding section, I am more in love than ever. There are so many talented designers creating original items for all of us to find. Etsy has offered my couples the ability to source original pieces that speak to them and share their story with all of their friends and family.
As you know, there is no possible way one could feature ALL favorite Etsy Shops in one post. That would be nearly impossible! So, today I am sticking with three. Check them out below.
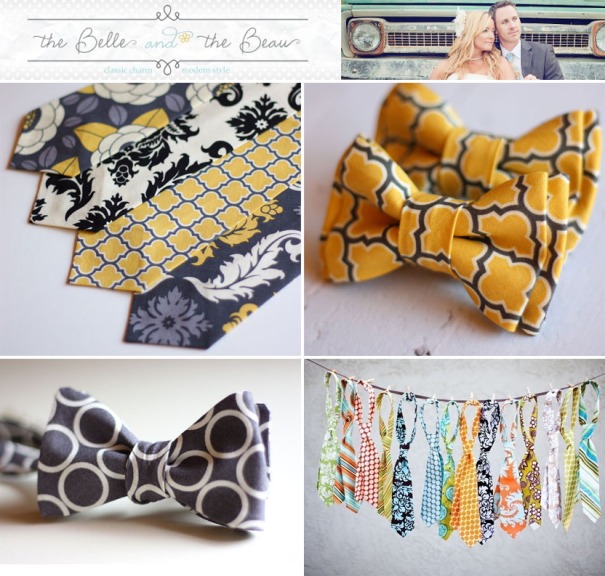
The classic charm and modern style of Belle and the Beau captured my interest with their bold patterns in their Beau accessories! There is also a fantastically romantic and whimsical Belle section of their shop which offers “shoe pretties,” and other adorable accouterments for the ladies.
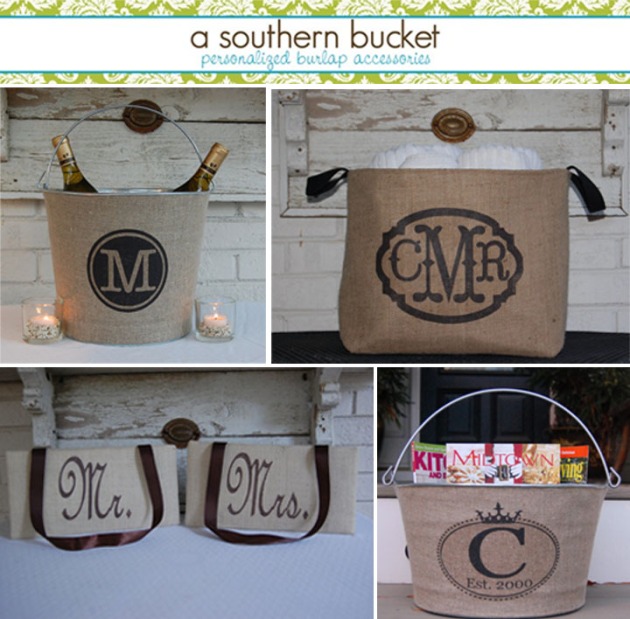
Sometimes a name says it all and that is certainly true in this case! A Southern Bucket has taken their passion for burlap and metal to create customized and functional buckets and vases. They will not only be a conversation piece at the wedding but they will also find a permanent place in your home.
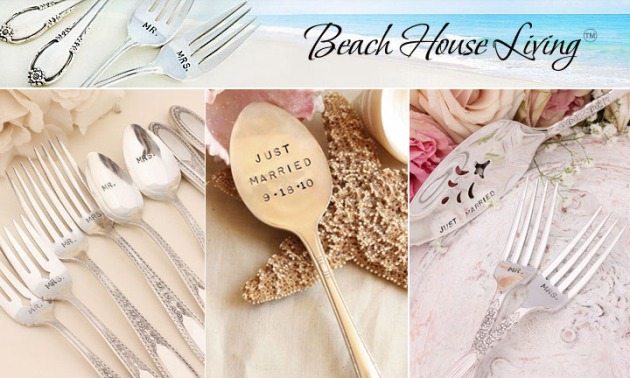
Let be be the first to tell you if you already didn’t know… Once you get married, the line between mine and yours becomes very thin. The least we can do is identify our own silverware! Beach House Living creates these charming silverware and cake cutting sets that will not only compliment your day but will also eliminate any confusion when setting the table in the years to come!
Do you LOVE Etsy too? We would love to hear from you. Please let us know what your favorite shops are…
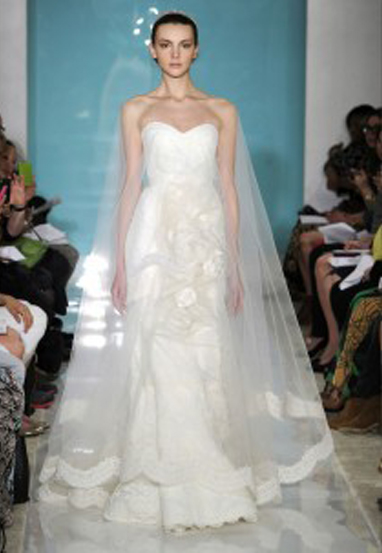
We are in love with Reem Acra’s interpretation of the traditional veil. It is so sheer over the skin and skims the floor so eloquently. All of this and it won’t stick to your lipstick or tangle in your eye lashes. GENIUS! For all of you ladies that want the length and drama of a veil without the actual hair accessory, this could be your answer.
Martha Stewart’s recent post asked what you would call it. Some said a “Shoulder Veil” while others said “Cape Veil.” I am leaning towards the Cape Veil because who does not want to feel like a super hero on their wedding day? Whatever you call it, I love it!
Every year we look forward to the The US Grant Wedding Showcase as an opportunity to not only design something fun, but to be inspired by all of the other brilliant designers. For those of you that were able to attend, I am sure you will agree when I say that it was a treat for the senses. Brides and Grooms were literally spoiled from the moment they walked into the luxurious US Grant Lobby and that was just the start. The entire hotel was transformed with a unique experience around every corner. Bravo to the US Grant team for putting together such a spectacular event for attendees and exhibitors alike.
The Liz Beck Events Booth:
Rather than creating a heavily flowered wedding tablescape, we decided to create a mini version of the LBE studio complete with a lighthearted interpretation of wedding day essentials. A mock-up of a table-scape was centered among our cubbies of colorful “Day Of” items to complete the studio showcase .
When thinking about the overall design, I wanted something that could represent a bit of a playful sophisticate. Bold with color while still keeping the clean lines. There are no better muses of color (in my humble opinion) than Jonathan Adler (happiness!) with his mid-century modern interiors and Kate Spade (swoon!) with their witty sense of style. Inspiration Found!
So, where does someone go when they have an outside of the box idea that calls for innovation and a great design aesthetic? That would be LaVonne of Adorations Botanical Artistry. She has an amazing ability to translate an idea into a work of art. I mean, look at the bouquet created with the yellow billy balls (upper left); it belongs at The Parker. LaVonne created monochromatic bouquets to work into our color blocked vignettes.

The center table represented our modernist couple that wanted an alternative to the flowing linens and traditional floral centerpieces. The white Bistro Table and clear ghost chairs certainly set the modern in motion. Magenta, Tangerine, Butter and Gold brought life to the table. Velvet geometric upholstry was used to create the lamp shade that sat atop a clean line bulbous vase. Tangerine chargers, Gold Flatware, Retro Stemware and a Patterned Gold Plate were placed at each setting. The stunning gold textured menus from J.Grace and the vintage metal tags completed the table.
Are you wondering how those flowers are so perfectly set into the bottom? That is a secret that LaVonne will have to share. I will just say that I was impressed!
The color blocked backdrop was so much fun to put together. Everything a Bride and Groom may need from their wedding planner could have been found…
Pink Bubbly to CELEBRATE, Still Water to quench
A gift of Kate Spade for the BRIDE
Lollipops and Bubblegum to REWARD the little ones (or the BIG ones)
Journals for PLANNING, Place card holders for holding
A Boutonniere for the lapel and CUFFLINKS for the cuffs
Hair PINS, Safety PINS, Straight PINS, Collar PINS and Push PINS
Shoes for DANCING
The all important 911 BAG OF TRICKS (known to fix any problem that may arise)
We would not have been able to even do this post if it wasn’t for Joshua Aull Photography. Thank you for your amazing detail work and for allowing us to share a story created through your photos.
We hope you enjoyed our corner of color as much as we enjoyed putting it together.
A HUGE THANK YOU to our wonderful industry friends that helped to bring everything together:
As much as I love thinking outside of the box, I am also a fan of keeping everything user friendly. This brings me to table numbers… Imagine being a guest and having to locate your table assignment which is identified solely by a Kanji symbol or simply a photograph of the couple. Although I think those are lovely ideas, there still needs to be an easy way for your guests to quickly identify where their seats are. I mean, we all like a good scavenger hunt but not when it comes to getting friends and family seated at your wedding.
It seems as if the actual table NUMBER has taken a back seat to more creative alternatives. So, today I wanted to bring back the NUMBER. Just because it is a sole numeral does not mean it can’t be creative.
These are some of my current favorites…
1. Take the number into account when designing your centerpieces. With all of the time spent designing, it would be a shame to just toss a number into the mix.
2. If you are using paper, get a holder. Most hotels do offer stands but they rarely compliment any aesthetic.
3. Make sure all of the table numbers are facing towards the entrance of the room.
There is no denying the fact that patterns have a permanent place in wedding design and decor. Often times I find brides have a color palette of 3 or so “wedding colors” and it is our job to give them life! I LOVE this part of the design process wherein we can incorporate those colors into a patterned textile, paper, accent decor or lighting. The trick is finding the balance of material and application but that is where the fun begins!
As we approach autumn, we are seeing a lot of patterns carrying their weight through 2011 and into 2012. I have outlined 2 of my personal favorites below.
Chevron: This BOLD pattern makes a really strong impact but it is all based on your selection of color. Lighter colors offer more of a subtle texture versus the bold colors I have shown below. A chevron is essentially a series of V’s laid out in a row. It’s a little bit wavy but with more of a hardened edge. When in doubt, think Missoni whose iconic fashion is synonymous with colorful pattern and an array of chevron detailing.P
Polka Dots: I just adore the sophisticated polka dot! Like any pattern, the dot can be BOLD or subtle. It is all about the application and color selection. 2011 was a banner year for the polk dot and this trend will carry on through 2012. From gowns, dresses and shoes to cake, stationery and flowers… the dot is everywhere. It can be just as timeless and classic as it can be whimsical and fun! If you are wanting to create a custom fabric to incorportate pattern into your event, check out Spoonflower. They will create fabric based on your graphics. Tomorrow (AUGUST 18, 2011), they are offering a free swatch for your custom fabric. I can’t wait to place my orders!
I love my heels as much as the next girl but there comes a time (about the 10th hour) when you need to kick those babies off! Comfort needs to be worked into your wedding day but we don’t want to sacrifice style! Like everything else with your wedding, there are endless options here as well. I was feeling a little traditional and went for neutral selections that would grace any bride. I will play with more color soon enough!
After seeing some of these flats, I may just forego the heels all together!
I LOVE these sweet and frilly DIY Doily Coasters that I found Ruffles and Stuff! She was making them as a mother’s day present but they are applicable to any occasion needing a charming coaster. Personally, I need to invest in a sewing machine but this project may just inspire me enough to get one!
- eight 5″ squares of muslin, or white cotton
- four-4″ squares of batting
- four-13″ lengths of lace
- Press the edges of your squares under 1/2″
- Lay your batting inside four of the sqaures
- Place the other four squares on top, pin, and stitch around the edges in two rows.
- Starting in the middle, spiral your lace around and around, with the bottom of each row tucked under the tops of the row before it.
- Stitch on in a spiral pattern, so there are no edges popping up.
I feel the same way about ribbon as I do about linens… I LOVE THEM! They can add so much character to your event and the sky is truly the limit when it comes to incorporating them into the decor. We are huge fans of The Ribbon Jar. They coordinate the ribbon for you, put it in a fabulous jar and tag it with a creative name. My favorite part is that you can customize your own selection of ribbon, choose the jar and personalize the name. Time to get your creative on!

You have the ribbon, now what? There are endless ways to incorporate an accent of colorful, textured ribbon into your soiree but let’s start with a basic bow.
 Martha’s Favorite Bow How-To
1. Shape two evenly sized loops, one in each side of the ribbon.
2. Cross right loop over left one.
3. Knot loops by threading right loop behind left one, under, and up through the hole; make sure ribbon is not twisted or bunched.
4. Pull loops into a smooth knot. Adjust loops; trim tails to be slightly longer than loops.
Enjoy!
Celebrate in royal fashion with Dom Pérignon Wedding.
Containing 12 bottles of Dom Pérignon Vintage 2000, Dom Pérignon Wedding also features an exquisite white lacquered box that holds an additional bottle of Dom Pérignon Vintage 2000 with a unique silver label which can be personalized with the bride and groom’s names and the date of their nuptials. This luxurious wedding box embodies not only the elegance of Dom Pérignon, but also the memorable atmosphere created by opening a bottle of Dom Pérignon for such a pivotal occasion.
In 1981, magnums of Dom Pérignon Vintage 1961 were poured at the wedding of Lady Diana Spencer and Prince Charles – each label bore their names and the date of the most watched wedding in history, and now, Dom Pérignon brings this royal touch to weddings everywhere.
Dom Pérignon Wedding can be purchased only by special order at Crush Wine & Spirits (www.crushwineco.com) & Sherry Lehman (www.sherry-lehmann.com) in New York and at other fine wine purveyors nationwide.
One of our favorite blogs, Ruffled, is in the process of reviewing fantastic DIY projects and I just fell in love with this one. It is an organic wish book made from scratch. Check out the step by step process below…
What you’ll need:
– 3 sheets of printing paper
– 1 sheet of watercolor paper or heavy stock paper (you can find it here)
– half a handful of cotton wad
– 3 tissues
– 1 tbsp rosemary leaves (you can find it here)
– 1 tbsp lavender flowers (you can find it here)
– 5 cups water
– sisal craft twine (you can find it here)
– food processor
– rolling pin
– hole punch
– scissors
– glue
The amount above is sufficient for 1 A4 sheet of recycled paper, or two 9×5 inch sheets for the wishbook. Depending on the wished quantity of sheets, increase the amounts of ingredients.
Step 1. Tear the paper into 1×1 inch scraps. Pull the cotton wad and tissues into similarly sized pieces. Mix. Add 4 cups of water. Heat the remaining 1 cup and pour over lavender flowers and rosemary leaves. Let it stand for 5-10 minutes to release the scents. Pour over the paper mixture. Let stand for at least one hour, or overnight.
Step 2. Pour the mixture into the food processor. Pulse until well-blended, resembling cooked oatmeal. Spread a 16×16 inch piece of linen. Pour the mixture over. Cover with another 16×16 inch piece of linen, and tap lightly with your hands, to arrange the mixture into a sheet. Roll the rolling pin over the sheet, to reach 0,2 inch thickness. Uncover and leave to dry (for approximately 1 day).
Step 3. During the first several hours, cover the sheet with linen and then with a towel, and roll the rolling pin across, so as to absorb the extra liquid.
Step 4. Once the sheet is almost dry, you can form different textures on it. Apply the wished motif and press (with books or other heavy items).
Step 5. When the sheet is dry, you may cut it into wished shapes and sizes. Sheets for this wishbook were cut into 9×5 inch pieces. When cut, punch two holes on each piece, and pull the twine through. You can use a rosemary sprig to tie the opposite ends of twine to it.
Step 6. For the title, use one of the scraps of paper and write the title on it. Slightly press with the pencil so as to imprint the title. Dab some glue into each of the letters and press the twine into the indentations.
Thank you for submitting this project Sanja!


